Steps To Setup A
Web application In Visual Studio 2010
11. Open VS2010 à File à New Project à Web application.
22. Create Your Own web application.
33. Set
the Configuration module Debug to release mode and then Build the
project.
44. Right
click on the Solution Explorer à Add à New Project à Other Project Types à Select Setup and DeploymentSelect Visual Studio Installer à Select Web Setup Project.
Name the WebSetup Project
as your Wish According to your Requirement. Now A Web setup project is added to
your Solution. Right click on the setup project .
A window is displaying
with four Options.
1.
Project Output.
2.
File
3.
Merge
Module.
4.
Assembly.
Select Project output in
this Window you have to add Primary Output and what are the files you want to
include in your setup. Like content files, Documentation files etc.
In the Solution Explorer
Click the Setup project and observe the Editors. File System editor,
User Interface Editor, Registry Editor, File Types editor,Custom
action Editor.
Now we have to work on
these Editors.
File System Editor:- In this Editor You have
One Folder Called Web Application Folder. Right Click on this folder add the
files like images, Connection String files, rtf files which
we are using in Setup.
User
Interface Editor:
By using this Editor You can add different type of windows which user can
interact with your application. Ex: Installation Window, Warning Message,
Installation Address, License File, Read file etc.
From the Customer
Information Window You can specify the Organization Number, Product Key to the
User. This Product Key you can generate through Installer Class. That will
explain In my next article.
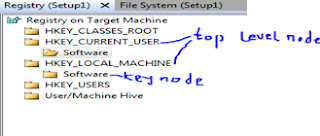
Registry Editor: The Registry Editor allows you to specify registry keys and values to be
added to the registry of the target computer. By default the Registry Editor displays a standard set of registry keys that
correspond with the standard Windows registry keys: HKEY_CLASSES_ROOT,
HKEY_CURRENT_USER, HKEY_LOCAL_MACHINE, HKEY_USERS, and HKEY_PER_USER. For Setup
projects, additional keys that match the Manufacturer property for the project
are displayed under HKEY_CURRENT_USER\Software and HKEY_LOCAL_MACHINE\Software.
Playing with registry need more experienced person otherwise it may course some trouble in target computer, but you can add or remove keys according to what your project needs.
Playing with registry need more experienced person otherwise it may course some trouble in target computer, but you can add or remove keys according to what your project needs.
To add a registry key
select a top level node, in the action menu click new key, then
type the new name and edit properties of the key in the properties window
as necessary.
To add a sub key select a key node, in the action menu point to new and then key and you can edit its properties from the properties window. Also you can remove a key by selecting it and then click Delete from Edit menu. Also you can add string, binary, and DWORD values. During installation the values will be written to the registry and any existing values will be overwritten by the values that you specify.
To add a sub key select a key node, in the action menu point to new and then key and you can edit its properties from the properties window. Also you can remove a key by selecting it and then click Delete from Edit menu. Also you can add string, binary, and DWORD values. During installation the values will be written to the registry and any existing values will be overwritten by the values that you specify.
Launch Conditions Editor: By Using This Editor You can
specify the Launch Conditions of your Application on target System. Example:
frame work condition (minimum, maximum), Version of IIS (minimum, maximum).
After Completed these
Steps build your setup file. And right click on the setup file click Install it
will install the .msi installer along with your product setup file.
Right click on Your
Solution à select Open
Folder in Windows Explorer à open Bin/Debug directory à You can Find Setup, msi installer of setup file.
Double click on your setup file and it will install your product.

.jpg)


With full process of web application development step by step with screenshot. it is very good information for begienner.
ReplyDelete